Welcome

Showing posts with label healthy. Show all posts

Tuesday, May 27, 2014

Yummy Red Juice- just try it!

Juicing seems to be my family's new favorite 'project' lately. We like to try different combinations of fruits and veggies and even though some look like pond scum, many taste pretty darn good for being healthy!


Getting started with this great trend can seem quite daunting, but don't over think it... and keep it simple. You do not have to purchase and entire produce isle at the grocery store to try this. We usually juice greens but this weekend we tried a new combination that ended up being named our 'favorite' RED JUICE! 
YUM YUM YUM!

One thing to point out is the difference between JUICES and SMOOTHIES:

JUICE is- extracting the actual juice from fruits and vegetables (not all fruits and veggies can be put through a juicer- i.e. bananas do not work- there is no juice extracted) 
SMOOTHIE is- a thick smooth, drink of fresh fruit pureed with milk, yogurt or ice
Think of smoothies as in a blender. Pretty much anything can be blended. 

The most popular advantage to Juice over a Smoothie has to do with the air created in the process. If you make a smoothie and have tummy discomfort, then juice might be your better option. If you don't skim the frothy part on the top of smoothies (especially when using spinach and kale) it could leave you feeling... well, a little gassy and uncomfortable. Hence the reason juice is gaining popularity.

I have a very basic Juicer- it was no more than $60 and purchased on Groupon but I have also seen in the in Target as well for similar pricing. I went basic to make sure we were going to use it enough to make purchasing a more expensive, fancier one worth it. This one has been great so far and comes apart easily to make clean up easy- which is one of the biggest complaints I hear about this... the time it takes to clean after making your scrumptious juice. Remember- keep it simple! (and cost-effective too)


So, see the black 'trash can' looking attachment on the left of the juicer- it collects all of your pulp and left over material once the juice has been extracted. It's pretty gross, not gonna lie. BUT, if you line that with a produce bag or even a shopping bag beforehand, when you are finished you simply pull the bag out and voila, no need to spend time scrubbing that clean! 


The red juice we make has all items shown above:

  • a handful of kale
  • a handful of spinach
  • 2 apples (I do not core or anything- you can throw the whole thing in)
  • a half of a beet (I cut it in half so you can see how 'blood' red it is. I also add the leaves that come with it
  • 3 little slices of ginger
  • 4 strawberries
  • a broccoli stem
  • lemon wedge with skin/peeling left on


Put all of that through the juicer and I usually finish with just a small amount of water to rinse everything through. Then be pure to stir well (this particular juicer has a part on the inside of the pitcher that detaches and you stir with that, but a spoon works too.

Also if you prefer you can add an ice cube or two and a straw- that's it! 
(my kids request the ice cube as it tend to be somewhat warmer than the smoothies we make with frozen fruit) 


There are so many health benefits to juicing- especially when using organic fruits and vegetables. Don't overwhelm yourself- just try it... and keep trying it. We make plenty that are not so good, but you come across some really good ones too! It's a great activity to get everyone involved in!


Stay tuned for more recipes, especially the green juice you see me post all the time!
I would love to hear from you when you try this one... comment below or find me on twitter, instagram and follow my pinterest boards! 
Post a picture of you with your juice and use the hashtag #RockstarMomLifeJuice 


Tuesday, January 28, 2014

Healthy Lunchbox Ideas

Does the idea of packing lunches overwhelm you or just plain bore you? Well here are some ideas of lunches my kids and I have come up with lately that made the 'remake-able meal' category and will hopefully help inspire you to launch your lunchtime in a healthy way! 


We take a picture of what we pack and tweek (that's tweek, not twerk, lol) to our liking, then print the pictures, hole punch and keep on a ring to refer to for ideas and planning. Hope this makes packing a healthy lunch much more appealing- both for your waistline as well as your finances! 

The key is to BE PREPARED:
  • Take a little time each time you grocery shop or designate a specific day to bag up snacks. We have them for both the refrigerator and the pantry- quick and easy to grab is what we are shooting for here.
  • You are more likely to eat healthy and save money when you can grab a healthy, conveniently packed snack to go- so keep this in mind when it seems to be a headache to set up. Also- get those kids to help. Mine actually enjoy measuring out a serving size and bagging! Good family time to prep and teaches the importance of planning and making healthy choices. 
  • Separate snack bags in organizer baskets in the fridge and pantry

We 'Snack/Lunch Prep' once a week to save time through the week- grab and go has never been so do-able! 

Easy snack ideas to pre-package/prep include: 
  • Celery with cream cheese, peanut butter or hummus (use the 2 oz mini cups with lids- pic below)
  • Cheese sticks with almonds 
  • Carrots with ranch or hummus (carrot chips work well too if you want to mix it up a bit)
  • Cucumbers cut length wise with ranch or hummus
  • Trail mix (we make different kinds every week or two)
  • Almonds in serving size bags
  • Cliff bars
  • Fiber one bars
  • Red grapes
  • Green grapes
  • Any fresh fruit (we love the little cutie clementines right now) 
  • Greek yogurt tubes (freeze them too and they stay cold until afternoon snack)
Here are the 2oz cups with lids that I purchase- Line them up and fill several at a time and then throw them in the zip lock baggie with the item being paired


Fresh greens with feta and sunflower seeds with italian dressing in 2 oz cup, clementine, apple, Simply Nature brand (comparable to the Cliff Brand) bar and almonds


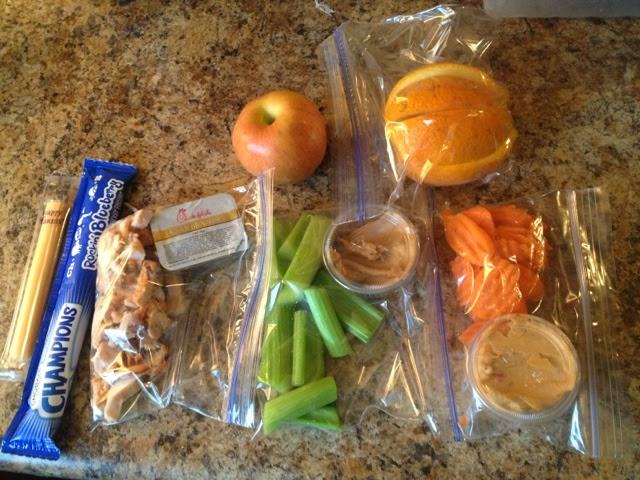
Chicken chunks to dip in yummy Chik-Fil-A sauce (use up those left over sauces), celery with organic peanut butter, carrots with hummus, greek yogurt, cheese stick, orange wedge-sliced, and apple
NOTE: This was a lunch, school snack and after school snack


Ham and cheese wrap (we use the Boar's head lunch meat for no preservatives or nitrates), Greek yogurt tube, carrots with ranch, celery with cream cheese, and blueberries

Grilled chicken chunks, celery with cream cheese, carrots with ranch, cheese stick, clementine, apple and edemame- shelled (you can buy these in the freezer section already shelled and they make a GREAT snack and loaded with protein) 

Hope this helps inspire you to think about lunch- and planning lunch in a new way! What other healthy ideas has your family tried? Comment below! Feel free to share on Facebook, Twitter and as always, pin away! I love Pinterest for this type of stuff!

Tuesday, January 21, 2014

Make your own tasty vitamin water- quick and easy ideas!

It the new year and at least half the world seems to be on board with eating healthier and getting fit! I have been asked a lot recently, about how my kids and I make our real vitamin water. We have several that we like and make often. These are meant to be EASY- so don't over think it!  


A Few Pointers Before You Begin:
* Be sure to wash your fruit and veggies thoroughly before tossing them into your water
* Shoot for the 12-24 hour range in the refrigerator before drinking- easy to make before you go to bed, then take with you the next morning (12-18hrs after making) or drink that evening (18-24 hrs after making)
* Drink within the first 48 hours to get the most benefits of the infused water and avoid the fruit and vegetables to break down.
* It not necessary to squeeze your fruit into the water- just slice in circles (not wedges) and let it soak in the water.
* Stir gently and strain as desired before drinking, or just stick a straw in it!
* Whenever possible buy organic fruits and vegetables


***Each of these recipes is designed for 2 quarts of water***


Raspberry-Lemon Water- Immune Booster

1/2 - 1 cup Raspberries
1 Lemon Sliced (or a lemon cut in half works too)

Citrus Water- Vitamin C Kicker

1 Orange Sliced
1 Lemon Sliced
1 Lime Sliced

Cucumber-Mint Water- Detox/Fat Flush

1/2-1 Cucumber Sliced 
Several Mint Leaves
A Few Basil leaves- optional

Apple-Cinnamon Water- Metabolism Motivator 

1-2 Apple(s) Sliced (Gala or Red Delicious work best, but feel free to use others as well)
1 Cinnamon Stick

Strawberry-Orange-Mint Water- Energy Punch 

1 cup Strawberries Sliced in Half
1 Orange Sliced
Several Mint Leaves

So, which one of these is your favorite? What are some of the others you have tried? Tell me in the comments below! I would love to hear from you! Be sure to share these with you friends on facebook, twitter and as always- PIN AWAY! 


Raspberry-Lemon Water- Immue Booster (pictured)

1/2 - 1 cup Raspberries
1 Lemon Sliced (or a lemon cut in half works too)